Solar energy is becoming a smart choice for many homeowners. It saves money, cuts carbon emissions, and offers long-term energy security. As a result, more people want to learn how to install solar panels at home. However, the process can seem overwhelming at first. This step-by-step guide makes everything clear and easy to follow. Each section breaks down the tasks, tools, and safety notes you need to understand.
By the end, you will know exactly how home solar installation works, what to expect, and how to prepare for a smooth setup. Above all, you will feel more confident taking the first step toward clean, renewable energy.
Why Installing Solar Panels at Home Matters
Solar power offers strong economic and environmental advantages. Many households choose this system because it can reduce monthly energy bills for decades. In addition, modern incentives make solar more affordable than ever.
Key benefits of home solar installation
- Lower electricity bills
- Higher home resale value
- Reduced carbon footprint
- Protection against rising utility rates
- Long-term energy independence
- Quiet, low-maintenance operation
These benefits show why thousands of homeowners make the switch every year.
Step-by-Step Guide to Installing Solar Panels at Home
Step 1: Evaluate Your Home’s Solar Potential
Before touching any tools, you must confirm that your property is suitable for solar power. This step ensures your investment delivers maximum efficiency.
Important factors to check
- Roof orientation
South-facing roofs receive the strongest sunlight. However, east or west positions also work well. - Roof angle
A roof pitch between 15° and 40° is ideal. In contrast, a flat roof may need angled mounts. - Shading issues
Look for trees, chimneys, or nearby buildings that cast shadows. Even partial shading reduces output. - Roof condition
Repair old or damaged roofing before installation. Solar panels last 25–30 years, so the roof should too. - Available space
On average, a small home needs 250–350 square feet for an effective system.
Pro Tip: Use smartphone apps like solar mapping tools to estimate sunlight levels. They give quick, realistic readings.
Step 2: Calculate Your Energy Needs
Knowing your energy use helps you size the right solar system. This ensures your panels generate enough power throughout the year.
How to calculate usage
- Review your past 12 months of electricity bills.
- Note your average monthly kilowatt-hour (kWh) consumption.
- Multiply your monthly average by 12 for yearly use.
For instance, if you use 850 kWh per month, your total is 10,200 kWh per year. Consequently, you can estimate how many panels your home requires.
Related considerations
- Future usage increases (electric vehicles, new appliances)
- Home efficiency upgrades
- Seasonal changes
Understanding these details helps you choose the right system size with confidence.
Step 3: Understand Key Solar System Components
Solar panel systems include several important parts. Each plays a specific role, and together they create a complete energy solution.
Main components
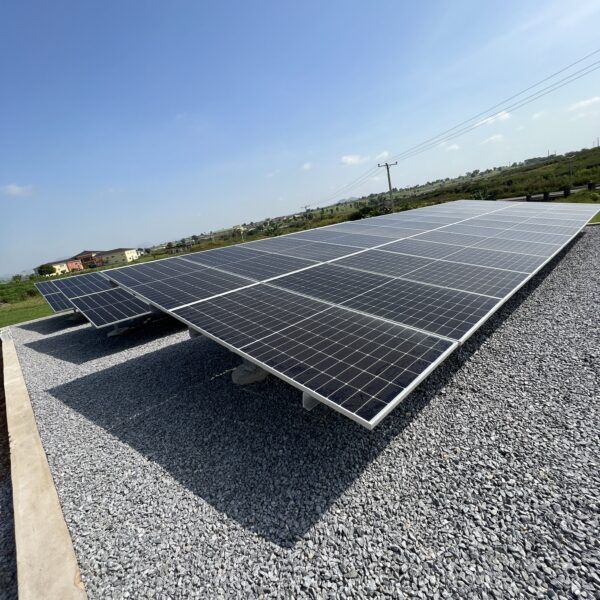
- Solar panels
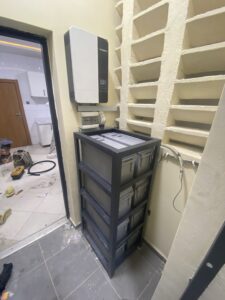
These convert sunlight into direct current (DC) electricity. - Inverter
It transforms DC electricity into usable alternating current (AC) for your home. - Mounting system
Brackets and rails secure the panels to your roof. - Wiring and electrical components
These connect panels to the inverter and your electrical panel. - Battery storage (optional)
Batteries store extra energy for night use or power outages. - Monitoring system
Apps or meters track energy production in real time.
Understanding these parts helps you make smart purchasing decisions.
Step 4: Check Local Permits and Regulations
Solar installation usually requires permits. These rules ensure your system meets electrical and safety standards.
Common requirements
- Building permits
- Electrical permits
- Homeowner association (HOA) approvals
- Fire code spacing guidelines
Contact your local building department for exact instructions. In many regions, the process is simple. However, it is important to follow every step to avoid delays or fines.
Step 5: Choose Your Installation Method
You have two main options: hire a professional or install the panels yourself. Both choices offer advantages.
Professional installation
- Faster setup
- Warranty support
- Certified electrical work
- Reliable safety standards
This option is ideal for most homeowners.
DIY installation
- Lower labor costs
- More hands-on control
- Great for skilled DIY enthusiasts
However, DIY requires careful attention to electrical safety and local codes. Consider your experience honestly before choosing this route.
Step 6: Gather the Necessary Tools and Materials
If you decide on a partial or full DIY installation, prepare your equipment ahead of time.
Common tools
- Drill and drill bits
- Screwdrivers
- Wrenches
- Ladder
- Stud finder
- Safety harness
- Measuring tape
- Roof sealant
- Conduit and cables
Having the right tools improves accuracy and reduces installation time.
Step 7: Install the Mounting System
The mounting system forms the base of your solar array. It must be strong and weather-resistant.
Installation steps
- Mark the rafter locations on your roof.
- Attach mounting brackets securely to the studs.
- Apply roof sealant to prevent leaks.
- Install rails along the brackets.
- Confirm everything is level and aligned.
Proper alignment ensures maximum sunlight exposure and long-term stability.
Step 8: Attach and Secure the Solar Panels
Once the mounting system is ready, you can position the panels.
How to install panels safely
- Lift each panel onto the rails.
- Secure them with mounting clamps.
- Leave proper spacing between panels for airflow.
- Double-check all attachment points.
Panels must be firmly locked in place because wind and weather can test their strength.
Step 9: Complete the Electrical Wiring
This step links the panels to your inverter and electrical panel. It requires careful handling and proper safety precautions.
Typical wiring tasks
- Connect panels in series or parallel.
- Run conduit to protect electrical wires.
- Install the inverter near your main panel.
- Connect the inverter to your home’s electrical box.
- Add grounding for safety.
Safety Warning: If you are not comfortable with electrical work, hire a licensed electrician. Incorrect wiring can be hazardous.
Step 10: Connect to the Grid and Test the System
Many systems remain tied to the power grid for backup electricity.
Final steps
- Schedule an inspection with your local authority.
- Wait for approval from your utility company.
- Turn on the inverter.
- Monitor system performance.
Once you see energy flowing, your solar system is officially live.
Step 11: Maintain Your Solar Panels Regularly
Solar panels need minimal maintenance, but simple care keeps them efficient.
Maintenance tips
- Clean panels every 3–6 months.
- Remove leaves, pollen, or debris.
- Inspect wiring yearly.
- Check your inverter for alerts.
- Trim trees to prevent new shading.
With proper care, your system can last 25–30 years or more.
Conclusion
Installing solar panels at home is one of the smartest investments you can make. The process may seem complex at first; however, each step becomes easier once you understand the basics. This guide provides a clear, practical path to help you move forward confidently. Whether you hire a professional or take a DIY approach, solar energy offers long-term savings, cleaner power, and a stronger sense of independence.
Final Thought
Start small and take one step at a time. Meanwhile, explore incentives, compare equipment, and talk to experts. Above all, remember that each step brings you closer to a cleaner and more sustainable home.